Search This Blog

Thursday, December 31, 2015

Another Year Over, A new Year about to Begin....

Well, I can't believe we are at New Years Eve already! Christmas came and went as quick as a flash, as it always does.

I've been busy but I'm now enjoying a nice long holiday from work and look forward to getting stuck into some knitting and spinning. I had a lovely Christmas ~ lovely weather, great food and most importantly having time with my family, all together.

Today has been about baking, do you remember the home made fruit mince I made a few weeks ago? I never got time to make any mince pies before Christmas but here's what I did today, in pictures:

You will need:
1 packet filo pastry
1 packet/sheet of ready made puff pastry
fruit mince/mincemeat
50g melted butter


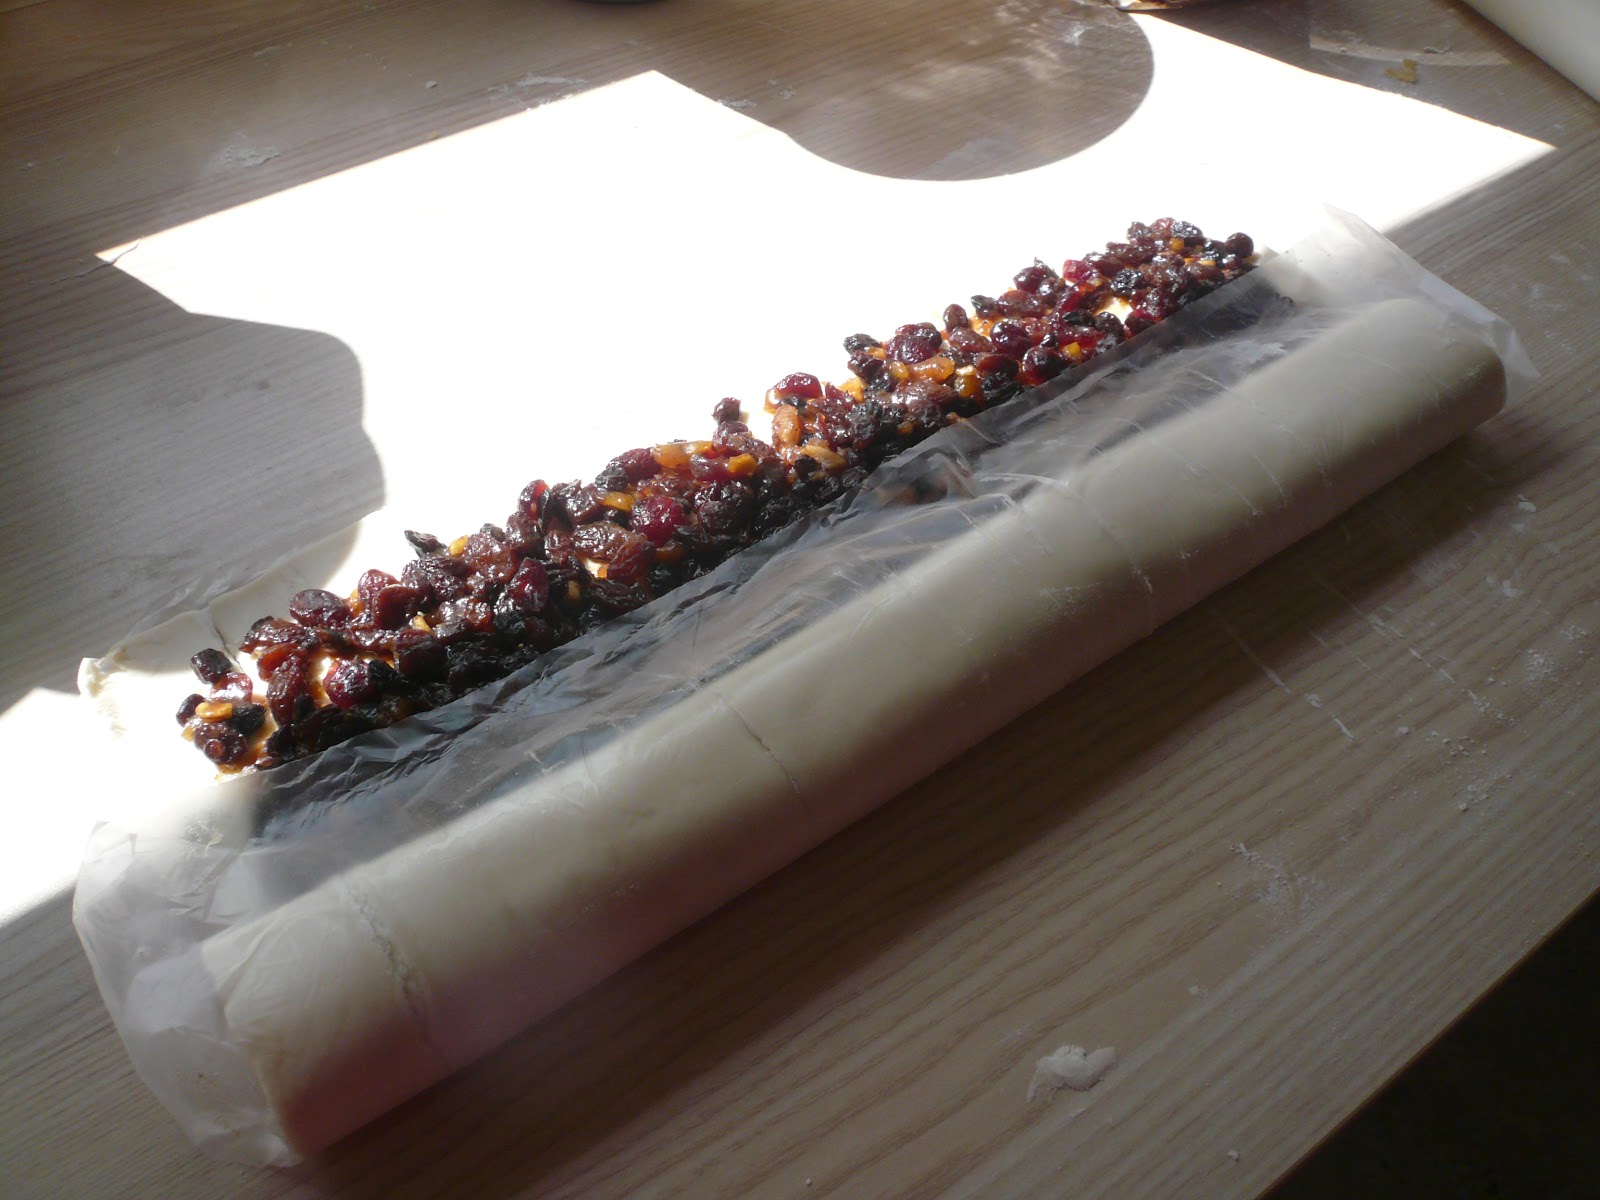
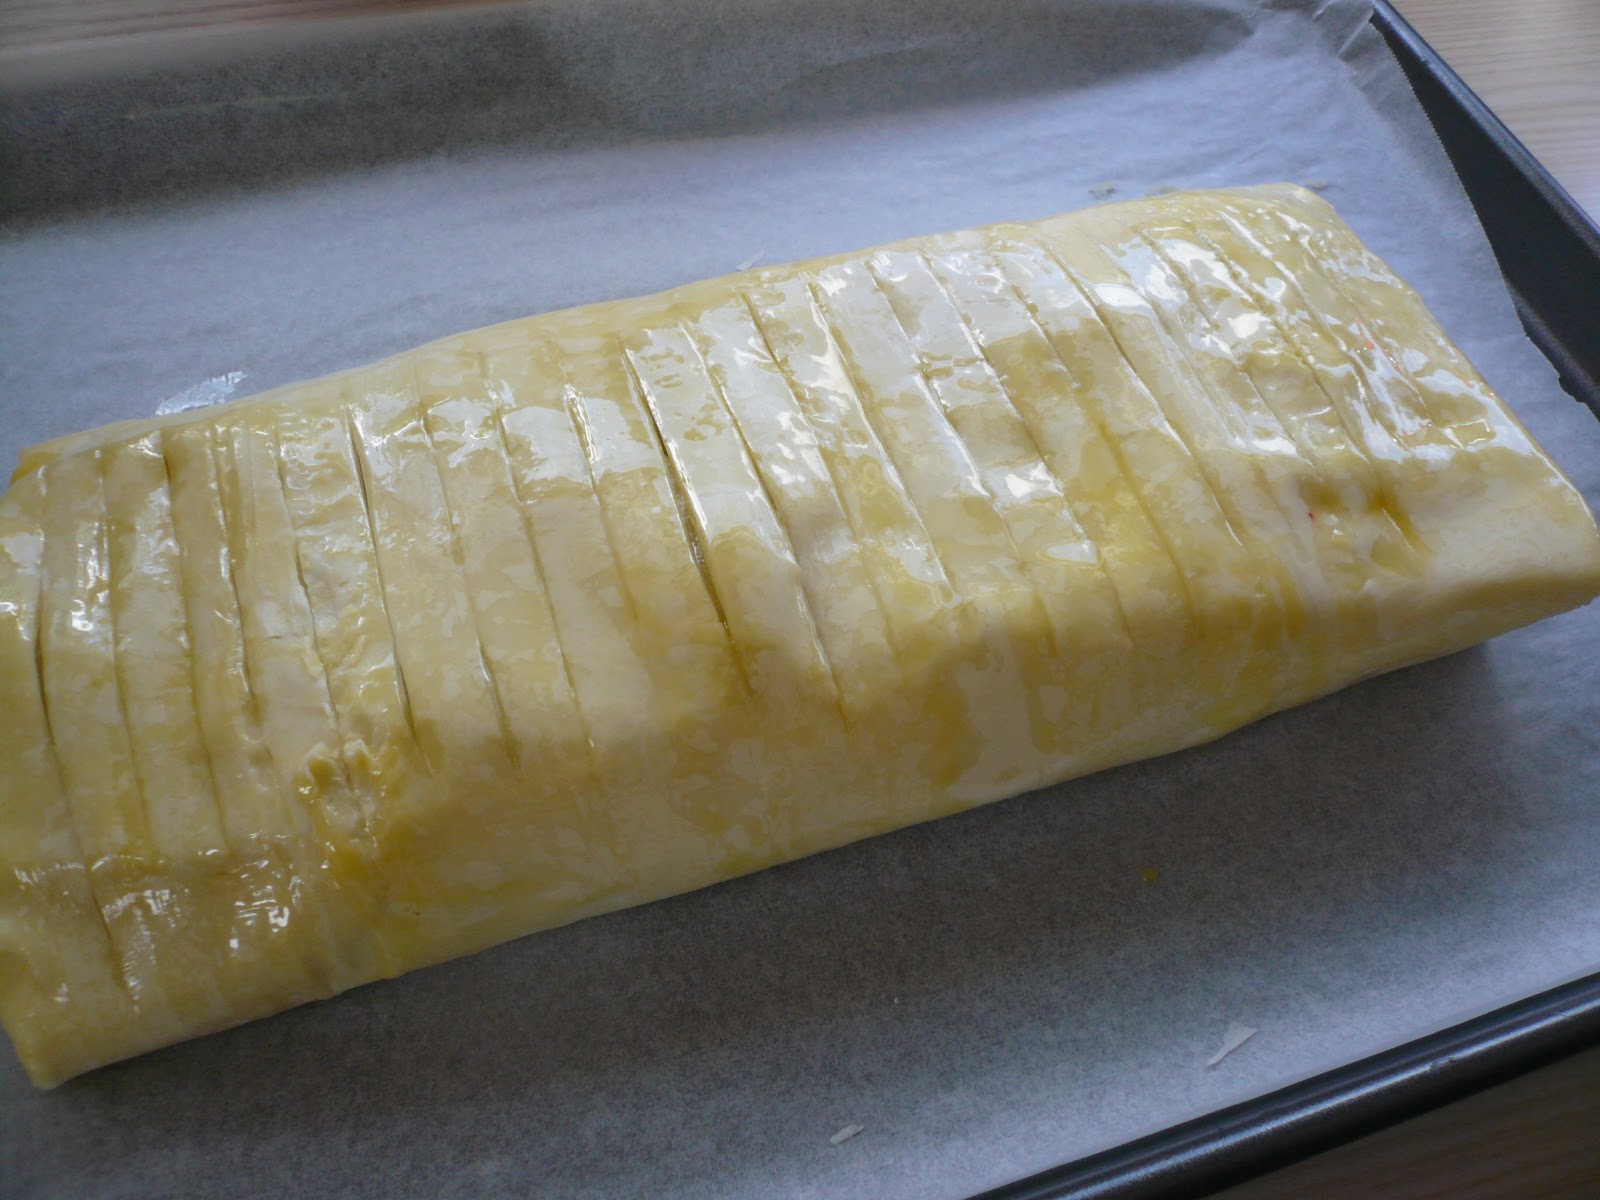
Roll out a sheet of puff pastry to 20 x 36-ish cm. I used a ready rolled sheet. Spread thinly with mincemeat but leave a good border around all 4 edges. A little tip: if you leave the ready rolled pastry on the sheet of cellophane it comes in it makes rolling this up much easier!


Roll up tightly, as if you were making a Swiss Roll then pop in the fridge.


When working with filo pastry -  take off the sheets you need and cover the rest with a damp tea towel or it will dry out extremely quickly!

Take 4 sheets of Filo pastry and brush 2 with melted butter, lay the unbuttered ones on top. Brush the top of one of the paired sheets with butter and lay the other pair on top so you have 4 layers. Lay it on top of a 12 hole muffin tin and gently scrunch the pastry into the cups, it will look like a pile of crumpled bed sheets but thats good. The sheets filled 6 cups so you will need to do 4 more sheets to fill the other side of the tin, depending on the size of your tins of course. Repeat this process with a second tin as this makes 24 pies.


Take the puff pastry roll from the fridge and slice it carefully, my slices were approx 1.5 cm wide.


You will need 24 slices in total.


Push a slice into each filo lined cup of the muffin tin. Bake at 200 degrees for about 20 minutes.


Let the tray cool for 10 minutes, then invert it onto a cooling rack, quickly invert it onto a second cooling rack so they are the right way up. Let them cool, then just break them apart. Easy peasy.


Sprinkle with snow and enjoy!


If you want to use up the rest of the pack of filo pastry you could make an apple strudel:


Brush the left over filo sheets with melted butter as before, layering as you go.
I used 5 granny smiths apples, peeled, cored and sliced thinly on a mandolin for the filling. Mix in 1/2 teaspoon cinnamon and 1 tablespoon of sugar. Pile it into the middle of the pastry and fold the pastry in neatly, brushing the edges and joins with melted butter to seal it. Bake at 200 degrees for about 30 minutes.


Here's the Yule Log I made for Christmas Day:


That's enough of the baking, now onto craft related goodies I received at Christmas:

I love this bag, it can hold heaps of stuff.


A proper set of crochet hooks, no excuse not to learn now.


On Christmas Eve my Colour Swap Holiday package arrived. Lovely mittens and a wool & silk blend yarn along with other goodies.


my package was from Laura in Illinois, U.S.A. the home of the White Squirrel ~ who is now hanging out on my Christmas tree.


Monday, December 21, 2015

Homemade Pork Pies....

Today's recipe is for an English speciality pie ~ known as a pork pie. I only make these once a year, at Christmas. The filling is a mixture of different textures of meat, the fatty parts add succulence, if you used totally lean meat the filling would be hard and dry and not as tasty. We usually eat it on Boxing Day, cold with a salad and pickles, chutneys etc. It's a very substantial pie and will feed a large crowd, it's always best when served fridge cold.

It's a bit of a faff to make, in fact the faff was sourcing all the ingredients this year. No pigs trotters to be found for miles and miles. I phoned 7 butchers shops this morning and no trotters were to be had anywhere, that was until I rang the Oxford butcher and lucky for me he had some.

I also had problems getting lard, which is essential for hot water crust pastry. Could not get any of this anywhere, so I improvised and used home made pork dripping. The pastry is so easy to make, it goes against everything you will have ever been taught about pastry making, but it works and is delicious.

You will need a 25-27 cm springform tin
I used a 20 cm one today and also made a mini pie in a 10 cm tin.

For the pastry:
100g lard
100g butter
200ml water
550g plain flour (you may need a bit more)
2 eggs
1 1/2 teaspoons of salt

For the pie filling:
1 kg shoulder pork cut into 1/2 cm dice (tedious but essential for the proper texture)
250 g streaky bacon, finely chopped
250g fatty pork belly, minced
12 fresh sage leaves, finely chopped
2 sprigs of thyme, leaves stripped
1 heaped teaspoon salt
1 teaspoon white pepper
1 teaspoon ground black pepper
1/2 teaspoon ground mace
pinch cayenne pepper
1bay leaf

1 beaten egg for the glaze

For the jelly:
2 pigs trotters (ask butcher to cut them in half lengthways
1 carrot
1/2 onion
stalks from the herbs
teaspoon black peppercorns
water to cover


Put both the fats and water in a small saucepan and heat gently until the fat has melted. Do not boil it. Meanwhile, put the flour and salt in a bowl and add the eggs, start to cut this in with a blunt knife and then slowly add the liquid mixing until you get a nice workable dough. You may not need all the liquid and I usually end up adding a little more flour. Turn out onto a floured surface and knead briefly. Wrap it and rest in the fridge for 2 hours.


While the pastry is resting start on the meat prep:
Cut the shoulder pork into 1/2 cm cubes. Put all the filling ingredients in a large bowl and mix it thoroughly, your hands are the best tool for this job.
Cover the bowl and chill while you line the tin with pastry.


Cut off 2/3's of the pastry and roll out until the right size for the tin, it will be fairly thick, much thicker than when you make shortcrust pastry, but that is how it is supposed to be. Line the tin and let the excess hang over the top. Pack the meat in, keep pressing it down and make sure there are no air pockets. Fill it right to the top, then roll out the pastry for the lid. Use a bit of beaten egg to brush around the top of the pastry to seal the lid on. Trim off excess pastry then crimp the edges together. Make a good size hole in the centre of the lid, for the steam to escape and for pouring in the jelly later.


Bake at 180 degrees for 30 minutes, then 160 degrees for a further 1 hour 15 minutes. Take the pie out of the oven, remove the outer ring and brush all over with beaten egg, return to the oven and bake for a final 30 minutes. Remove and leave to cool.
While the pie is cooking make the stock:
Put all the ingredients in a large saucepan and add just enough water to cover the contents. Pop on the lid and bring to the boil then simmer gently for 2 hours. Strain through a fine sieve lined with kitchen paper and let the liquid cool slightly. Once the pie is cooked and has cooled for about an hour, use a funnel to pour the jelly stock into the pie. Do this slowly, let it settle for a few minutes then add more and so on until the pie can't take any more. Leave to cool to room temperature then put it in the fridge. Once it is chilled wrap the pie in baking paper and then put into a plastic bag. It will keep for 2 weeks uncut but once cut it's best eaten within a week.


Don't worry if the meat juices ooze out and over the top during cooking. This is how they should look.

Monday, December 7, 2015

Christmas Fruit Mince..

It's December already, can't believe we are so close to Christmas and I feel so unorganized!

So to get me in the Christmas mood I made mincemeat (or fruit mince as it's known as here). I've made it before and blogged about it but I have, for the last 2 years, used a Mary Berry recipe that was in one of her books that I've had for many years but never really looked at. Again, this uses butter instead of suet and there are far less apples to peel, core and chop with this recipe.

Ingredients:
Makes 4 x 370g jars

175g currants
175g sultanas
175g raisins
175g dried cranberries
100g mixed peel
1 small cooking apple, peeled, cored and finely chopped
125g butter, chopped into cubes
225g light brown soft sugar
1/2 teaspoon cinnamon
1 teaspoon mixed spice
finely grated rind and juice of 1 lemon.
100ml rum, brandy or sherry

You will need to use a large pan. Melt the butter over a gentle heat then put in all the other ingredients except the alcohol.

Simmer very gently for 10 minutes then allow to cool completely.

Stir in the alcohol.

Spoon into sterilised jars, seal tightly, label and store in a cool dark place.


Monday, November 30, 2015

Hanging Baskets

I'm really pleased with my hanging baskets this year. I grow the flowers from seed in my greenhouse and plant up the baskets when the seedlings are big enough. Then the baskets are hung in the greenhouse for a further 2-3 weeks until the plants are almost ready to bloom. As usual, the day after I hang them outside the Nor'Wester comes and batters them to within an inch of their lives, but the one that is in the most sheltered spot always looks the best all year round:

This basket is planted with trailing lobelia in mixed pinks and pink trailing petunias.


The trick to getting a nice full looking basket is to simply over plant the basket, (I used 6 of the lobelia plants and 3 petunias), water twice a day and feed every week. Pick off dead flowers every few days. After about 6 weeks of blooming, the flowers will start to look straggly and past their best - chop the whole lot back so the plants are just a couple of inches high (you have to be ruthless), then continue the feeding and watering regime and the baskets will soon give another flush of flowers.

Sunday, November 29, 2015

Sunday Baking...

A Sticky Orange Marmalade Cake.

Today's recipe is for a very classic British cake, it's essentially a Victoria sponge cake with the addition of marmalade. The topping is what takes it to the next level.

But first a few tips ~ using Seville Orange chunky marmalade, if you can get it, makes a big difference - the regular orange marmalade just makes the cake overly sweet. I make my own Seville Orange marmalade but I have seen it available in New Zealand, usually on the International isle in the supermarket. Duerr's and Frank Coopers are both good brands. Seville Oranges have a very bitter but strong orange taste.

The cake will seem to brown quite quickly, use a sheet of baking foil laid loosely over the top of the tin if you feel it's starting to go too brown. The cake is supposed to be a nice deep brown, but not burnt.

Whenever I'm baking I try to fill the oven as I'm too Yorkshire to put it on for a single item, that's why I often make 2 things at a time. It's no trouble to double the recipe and freeze the second cake or gift it, or bake something else at the same time that requires the same oven temperature. But that's just me!

When beating the butter and sugar together, beat it for a few minutes longer than you think it needs, this gives a very light and airy cake. The cake will rise up while baking into a high dome, but will then fall flat again (which is a sign that it's almost cooked).

For the Cake:
175g unsalted butter, softened
175g caster sugar
3 large eggs at room temperature, beaten
175g Self Raising Flour
1/2 teaspoon Baking Powder
1/2 teaspoon salt
3 tablespoons chunky Seville Orange Marmalade
2 tablespoons milk

To finish:
3 tablespoons Seville Orange Marmalade
50g Icing Sugar, sifted
Water to mix

Preheat the oven to 180 degC, gas mark 4

Grease a 9"cake tin and line the base with non stick baking paper.

Cream the butter and sugar together until light, fluffy and pale in colour.

Gradually beat in the eggs a little at a time, beating well after each addition. Add 1 tablespoon of flour with the last of the egg.

Sift the remaining flour with the baking powder and salt and gently fold into the cake mixture with a large metal spoon, then gently stir in the marmalade and milk.

Spoon the mixture into the tin and smooth the top as evenly as you can.


Bake for 50 - 60 minutes or until nicely browned and firm to the touch. remove from the oven and run a flat bladed knife around the inside of the tin to loosen. Leave to cool for 15 minutes then carefully turn out onto a wire rack to cool, right side up.


Warm the marmalade (this can be done in the microwave on low power) and gently brush it over the top of the cake. Allow the cake to cool completely before icing:


Add a little water to the icing sugar and mix to a smooth and runny consistency. Drizzle it over the cake allowing it to run down the sides a little. Leave it to set.


This cake will keep in an airtight container for up to 5 days, but I bet it doesn't last that long.

Saturday, November 28, 2015

Green Leaves Socks...

I haven't had a chance to write anything over the past week or so, but as usual I have been busy knitting away:

The Yarn is Shibui Knits Sock in Wasabi and the pattern is Golden Leaves by Cookie A.

I loved knitting these, the pattern is interesting but easy.


Modifications:
I knit the pattern as a mirror image on the second sock instead of knitting them both the same (as they are in the pattern). I also altered the rib, in the pattern it's a complicated mix of Knit tbl and purl, but after I looked at the graph I realised that knitting plain old K1 tbl, P1 would line up with the twisted stitches in the pattern, I prefer K1 P1 or K2 P2 for sock rib as it gives a more snug fit.

I'm really happy with these and will knit this pattern again.

After blocking the socks ~ and as I seem to be on a major sock knitting roll at the moment ~ I cast on these mini baby socks:

The yarn is Lorna's laces but I forget the colourway, it's left overs from the first pair of socks I ever knitted which must have been about 14 years ago. I'm using 2 mm needles and the pattern is a free Interweave Pattern.
44 stitches - a mock cable rib for the leg with a short row heel and toe.

Wednesday, November 18, 2015

More Hand Spun Sock Yarn

I have been busy spinning another batch of the Corriedale/Nylon sock yarn:


I spun 100g of fibre into fine singles then Navajo plied it for a 3 ply strong sock yarn.


I dyed it my favourite colour, a variegated purple!

320 metres. I think this may become a pair of Simple Skyp Socks for myself.


I've also been spinning some Perendale fleece. The locks were washed with wool scour in a mesh bag, after drying I quickly flick carded them and spun up 2 bobbins of singles. I did a 2 ply yarn this time:

250 metres of yarn, it still needs soaking and drying but I'm hoping that it's going to be a sport weight yarn.


Perendale sheep were developed in Palmerston North, New Zealand by crossing hardy Cheviot rams over Romney ewes. Perendale clip is low lustre and crisp to the touch.
Fibre diameter: 30 - 37 microns
Staple length: 100 - 150 mm
Fleece weight: 3 - 4.5 kg

A good fleece looks bouncy and will feel crisp. The higher bulk fleece has better shape retention and higher insulation properties. If you add a little more twist than normal you will get a rounded and hard wearing yarn, it's also excellent for Navajo plying.

You won't be able to produce a typically smooth and dense true worsted yarn with this fleece as it tends to poof up, capturing the air within the yarn. If you use the worsted technique you will produce a different type of yarn with all the worsted strength and durability, but with reduced weight and added warmth.

Perendale also makes an excellent woollen yarn which will produce a light yet bulky yarn.

Wednesday, November 11, 2015

A Lovely Memento

My dear Brother sent me a beautiful memento of Ruby and Molly, my two Cavalier King Charles Spaniels, sadly both of whom passed away over the last year. I had a lump in my throat when I opened it, the likeness is incredible, it's an ink drawing done by a friend of my Brother from a photograph:


Sunday, November 8, 2015

Apron All Finished Off!

I finished the apron:
I had to rethink the frill at the bottom.
I wanted a fuller and deeper frill but then after tacking it on I realised that because the two fabrics are different weights, (the red is a much heavier fabric) the frill was going to constantly try to drag the front of the apron down. So I removed the frill and cut the depth and width down by 40% then re-gathered it. It sits nicely now and doesn't want to slip forwards. Never mind, I'm happy with how it's turned out even though the frill is smaller than I would have liked.


Leftover Perendale fleece and my brooch from the Highland Spin yesterday. More about that later in the week.


This is what we have been working at on and off for the past few weeks, today my hubby finally finished doing the finicky time consuming bits of painting and I finished the Roman Blind and hung it. Another room completed, we are getting there slowly but surely with the house.

Friday, November 6, 2015

Fast Food.....

I was a child of the '70's and grew up in a small village in Yorkshire where there was no such thing as fast food - as we know it today that is. No high street burger chains, no deep fried chicken shops, no pizza parlours - there was a fish and chip shop and in later years a Chinese take away both of which were a rare treat. Today fast food is everywhere you turn, it's often cheaper to eat out than to cook healthy nutritious meals at home. Food full of bad fats, chemicals and additives and heaven knows what else.

Today I needed fast food ~ after a long day at work and coming home ravenous with only myself to cook for:

Ruffled eggs with asparagus and wholegrain toast.

Preparation time: 1 minute
Cooking time:  4 minutes

No chemicals or additives.
Eggs from my free range hens, asparagus from my chemical/spray free vege garden. The butter on the toast is homemade cultured butter.
That's my version of fast food!

Tuesday, November 3, 2015

A Sewn Retro-Style Apron

It's November already!
I spent 2 full days working in the garden over the weekend ~ mowing the lawns, clearing weeds, laying mulch, cutting back the camelias and other overgrown shrubs and planting new things. I love this time of year although the garden does demand a lot of my time.

Because of the above I haven't done much making over the past week but did find a little time to make a start on a secret santa gift for one of my work colleagues. I decided to make a retro style apron as the person I am secret santa for likes to cook.
The fabric is a bold and bright 100% cotton digital floral print (from IKEA) and I'm using a bold red heavy cotton fabric (perfectly matching the deep red roses) for the trim:

The apron, when finished, will have a deep red flouncy frill along the bottom edge and a red pocket.


I love the little details on this particular apron (which is why it appealed to me) it has fully sewn-in and hemmed interfacings ~


A sweetheart neckline with dressmaker pleats down the front and sides ~


Pressing the pleats after sewing them.


I hope to have this little beauty finished in the next day or so.
There is knitting on my needles at the moment, an item for our President's Challenge ~ an annual event the spinning guild hold at our Christmas Lunch in December, so I can't post any pictures of it yet.

Sunday, October 25, 2015

Princess Baby Bonnet

I finished the baby bonnet, but I ran out of yarn and didn't have enough to do a knitted tie cord so I made a twisted cord instead:

The bonnet is knit flat in one piece and shaped with short rows at the bottom edge.
The back of the head is then worked in two halves and grafted together along the centre back. The pattern is A bonnet for Every Princess.
It took 27g of yarn.

Thursday, October 22, 2015

A Finished Knitted Baby Dress

I finally finished knitting the baby dress, here's a photo of it drying:


A close up of the yoke:

The dress took just 73g of the natural merino and about 10g of the pink.


Here are pictures of the first Baby dress I knit using different yarn:

The main body of this dress was knit in Rowan Cashcotton 4 ply and the pink trim was a bit of Rowan 4 ply cotton.

Next on the list is a baby bonnet ~ as seen on Princess Charlotte. You know the one I mean!


Close up of the yoke:


Tuesday, October 20, 2015

Quilt Planning & Banana Walnut loaf

Sometimes I get the urge to sew ~ to make something that's both useful and beautiful. I recently came across this Tiny Tile Quilt and the pattern really appeals to me on many levels. Firstly I love the quaint simplicity of it's design and secondly I know I am capable of making this.
After a rummage through my fabric stash I came up with these fat quarters:

I will possibly ditch the white for the background though and look for some ivory/neutral fabric. I feel the white is a wee bit too stark against the other bold colours. I have a lot of block cutting and chain piecing to do!


Another cake was baked yesterday as we had visitors. Here's a recipe for a very simple loaf, nice to eat as is or you can drizzle icing over the top.

Banana & Walnut Loaf

200g Unsalted butter, melted
170g caster sugar
4 medium eggs
250g plain flour
200g very ripe banana, well mashed
3 teaspoons of baking powder
125g walnuts, chopped

Line a large loaf tin with nonstick baking paper. Melt the butter, pour it into a mixing bowl with the sugar, then beat in 100g of the flour until smooth. Add the eggs one by one, beating each one in well before adding the next, then mix in the mashed banana. Sift together the remaining flour and baking powder into the bowl and stir until smooth. Lastly add the chopped nuts and gently stir through.
Spoon the mixture into the tin and bake at 160C (140C fan)/320F for about an hour. The cake is done when a skewer poked into the centre comes out clean, it will feel nice and springy when you press it in the centre. Enjoy it bare or you can butter the slices. it will keep for about 5 days in an airtight tin (if it lasts that long!)